
Most Telerivet projects start with a contact list that already exists somewhere: a spreadsheet of customers, a CRM export, a registration database, a field team roster. Importing that list is how you bring your existing audience into Telerivet and make them available for campaigns, services, and automation. This article covers how to prepare your data, what happens during the import, and how to handle updates and re-imports cleanly.
Before importing, it is worth reading Managing Contact Fields in Telerivet if you have not already. The fields you define determine what data you can bring in and use. Importing first and figuring out fields later is the most common source of contact data problems.
Preparing your file
Telerivet accepts files in .xlsx, .xls, .csv, .txt, and .tsv formats, up to 1,000,000 rows. A well-prepared import file will have:
- One column per data point you want to store, with a header row naming each column.
- A column for phone number, which is the default lookup key Telerivet uses to match rows to existing contacts.
- Phone numbers in a consistent format. International format with country code (+63, +254, +977) is recommended, especially for projects covering multiple countries or using multiple routes.
- No merged cells, no summary rows, no formatting that adds characters to values.
If your file has data you do not want to import (internal notes, calculated columns, row numbers), either delete those columns before importing or mark them as unassigned during the column mapping step.
Two ways to import
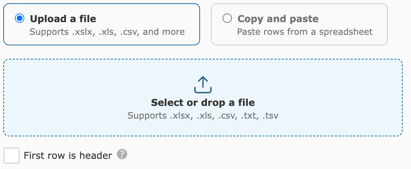
Telerivet offers two import methods, both accessible from Add Contacts > Import contacts at the top right of the Contacts page.
Upload a file is the standard path for any import you have prepared in advance. Drag and drop your file into the upload area or click to browse. Check First row is header if your file has column names in the first row, which is almost always the case. Click Next to proceed to column mapping.
Copy and paste is useful for quick imports directly from a spreadsheet. Copy the rows you want to import, paste them into the text area, and proceed to column mapping. This method works well for small batches or for adding contacts during a testing phase without creating a separate file.
Column mapping
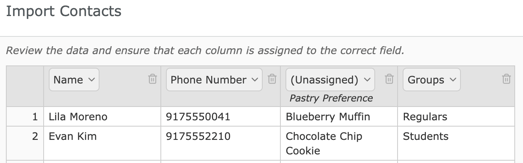
After uploading or pasting your data, Telerivet shows a preview of your rows and prompts you to assign each column to a contact field. Columns Telerivet recognizes automatically (Name, Phone Number) are assigned immediately. Other columns appear as Unassigned until you map them.
For each unassigned column, you can:
- Assign it to an existing field by selecting from the dropdown.
- Create a new field by selecting the option to add a new field. A modal asks for the field name, type, variable name (auto-populated), and options (Read-only, Lookup key, Show on Conversations tab). The field is created immediately and the column is mapped to it.
- Delete the column if you do not want to import that data.
Take a moment to review the preview rows before clicking Import. This is the best opportunity to catch formatting issues, misaligned columns, or field type mismatches before they affect your contact records.
The lookup key and deduplication
At the bottom of the column mapping screen, Telerivet shows the active lookup key for this import. Phone number is the default. When Telerivet finds a row in your file whose phone number matches an existing contact, it updates that contact's fields rather than creating a duplicate. Fields present in your file overwrite the existing values. Fields not in your file are left unchanged.
If your data uses a different unique identifier (a Customer ID, Staff ID, or CRM record ID), you can designate any custom field as a lookup key. A contact field must already exist and be marked as a lookup key in your field settings for this to work. For setup instructions, see Adding Custom Fields in the User Guide.
Adding contacts to groups on import
The column mapping screen also includes an Add to groups field. Any contacts in this import will be added to the groups you select here, in addition to any group assignments that already exist on their records. This is useful for tagging an imported cohort as a distinct audience: "October Newsletter Import," "Event Pre-Registrants," "Clinic Batch 3." Use group assignment at import time to preserve context about where a set of contacts came from.
Re-importing and updating contacts
You can import the same contact list multiple times. Each re-import updates existing records using the lookup key and adds any new contacts not previously in the project. Use this to:
- Update a field across a large contact set (re-import with updated values in a specific column).
- Add new contacts to an existing group without affecting the contacts already there.
- Sync a fresh CRM export after a period of activity.
If you need to update a single field across all contacts at once without a file, the bulk Update field action in the Actions dropdown on the Contacts page may be faster. See Understanding Contacts in Telerivet: Lists, Filters, Groups, and Segmentation for how bulk actions on filtered sets work.
Importing via the API
For programs that need ongoing contact sync from an external system, CRM, or database, the Telerivet REST API supports creating and updating contacts programmatically. This is the right path for real-time syncs, integration with platforms like HubSpot, or automated population of contact fields from an external source. Contact your account team or Solution Engineers to discuss the right integration approach for your setup.
Frequently asked questions
What happens if my phone numbers are in different formats? Telerivet normalizes phone numbers during import, but inconsistent formats (some with country code, some without) can result in duplicate contacts if the same number appears in both formats. The safest approach is to standardize all numbers to international format with country code before importing.
Can I import contacts without a phone number? Phone number is the required field for any contact in Telerivet, since it is the identifier used to send and receive messages. Rows without a phone number will be skipped during import. If your file contains contacts with email addresses but no phone numbers, those rows cannot be imported.
How do I update a field value for contacts already in Telerivet? Re-import a file that includes the phone number column (as the lookup key) and the field you want to update. Telerivet will match each row to the existing contact and overwrite the field with the new value. You can also update a field in bulk for a filtered set of contacts using the Actions menu on the Contacts page, without creating a new import file.
Best practice tip
Assign imported contacts to a group that identifies the source and date of the import, for example "Field Team Import June 2026." This costs nothing and gives you a permanent record of where a set of contacts came from. If a data quality issue surfaces later, that group makes it possible to isolate the affected contacts and correct the problem without touching your broader list.
For guidance on growing your contact base beyond imported lists, see Smart Ways to Grow Your Messaging Lists and Collect Zero Party Data on the Telerivet blog.
Need help structuring a large import, setting up a lookup key for a custom identifier, or connecting an external CRM to Telerivet? Our Solution Engineers can help.